- 01/11/2026
SAIL TENDER - ASSEMBLY & DISASSEMBLY FROM A TO Z
- Have you just purchased a Sail Tender, or are you simply wondering how to set one up before buying? This article is for you!
Discover how to set up and pack away your inflatable tender in just a few simple steps!
To make things even easier, we've also created a step-by-step video tutorial covering the entire process!

1. Before You Start: Preparing Your Sail Tender
Before beginning the assembly process, it's important to choose a suitable location and prepare all your equipment.
One of the main advantages of the Sail Tender is its portability. Once deflated and packed into its carrying bags, it can easily be transported in the trunk of a car, onboard a boat, or directly to your sailing location.
Choose a Suitable Location
Start by finding a large, flat, and clear surface.
A sandy beach, a grassy area, or any other clean, non-abrasive surface will work perfectly. Just make sure there are no sharp objects, broken shells, or debris that could damage the inflatable tubes.
You should also allow enough space around the boat to assemble the rigging components and unfold the sail comfortably.
Unpack and Organize Your Equipment
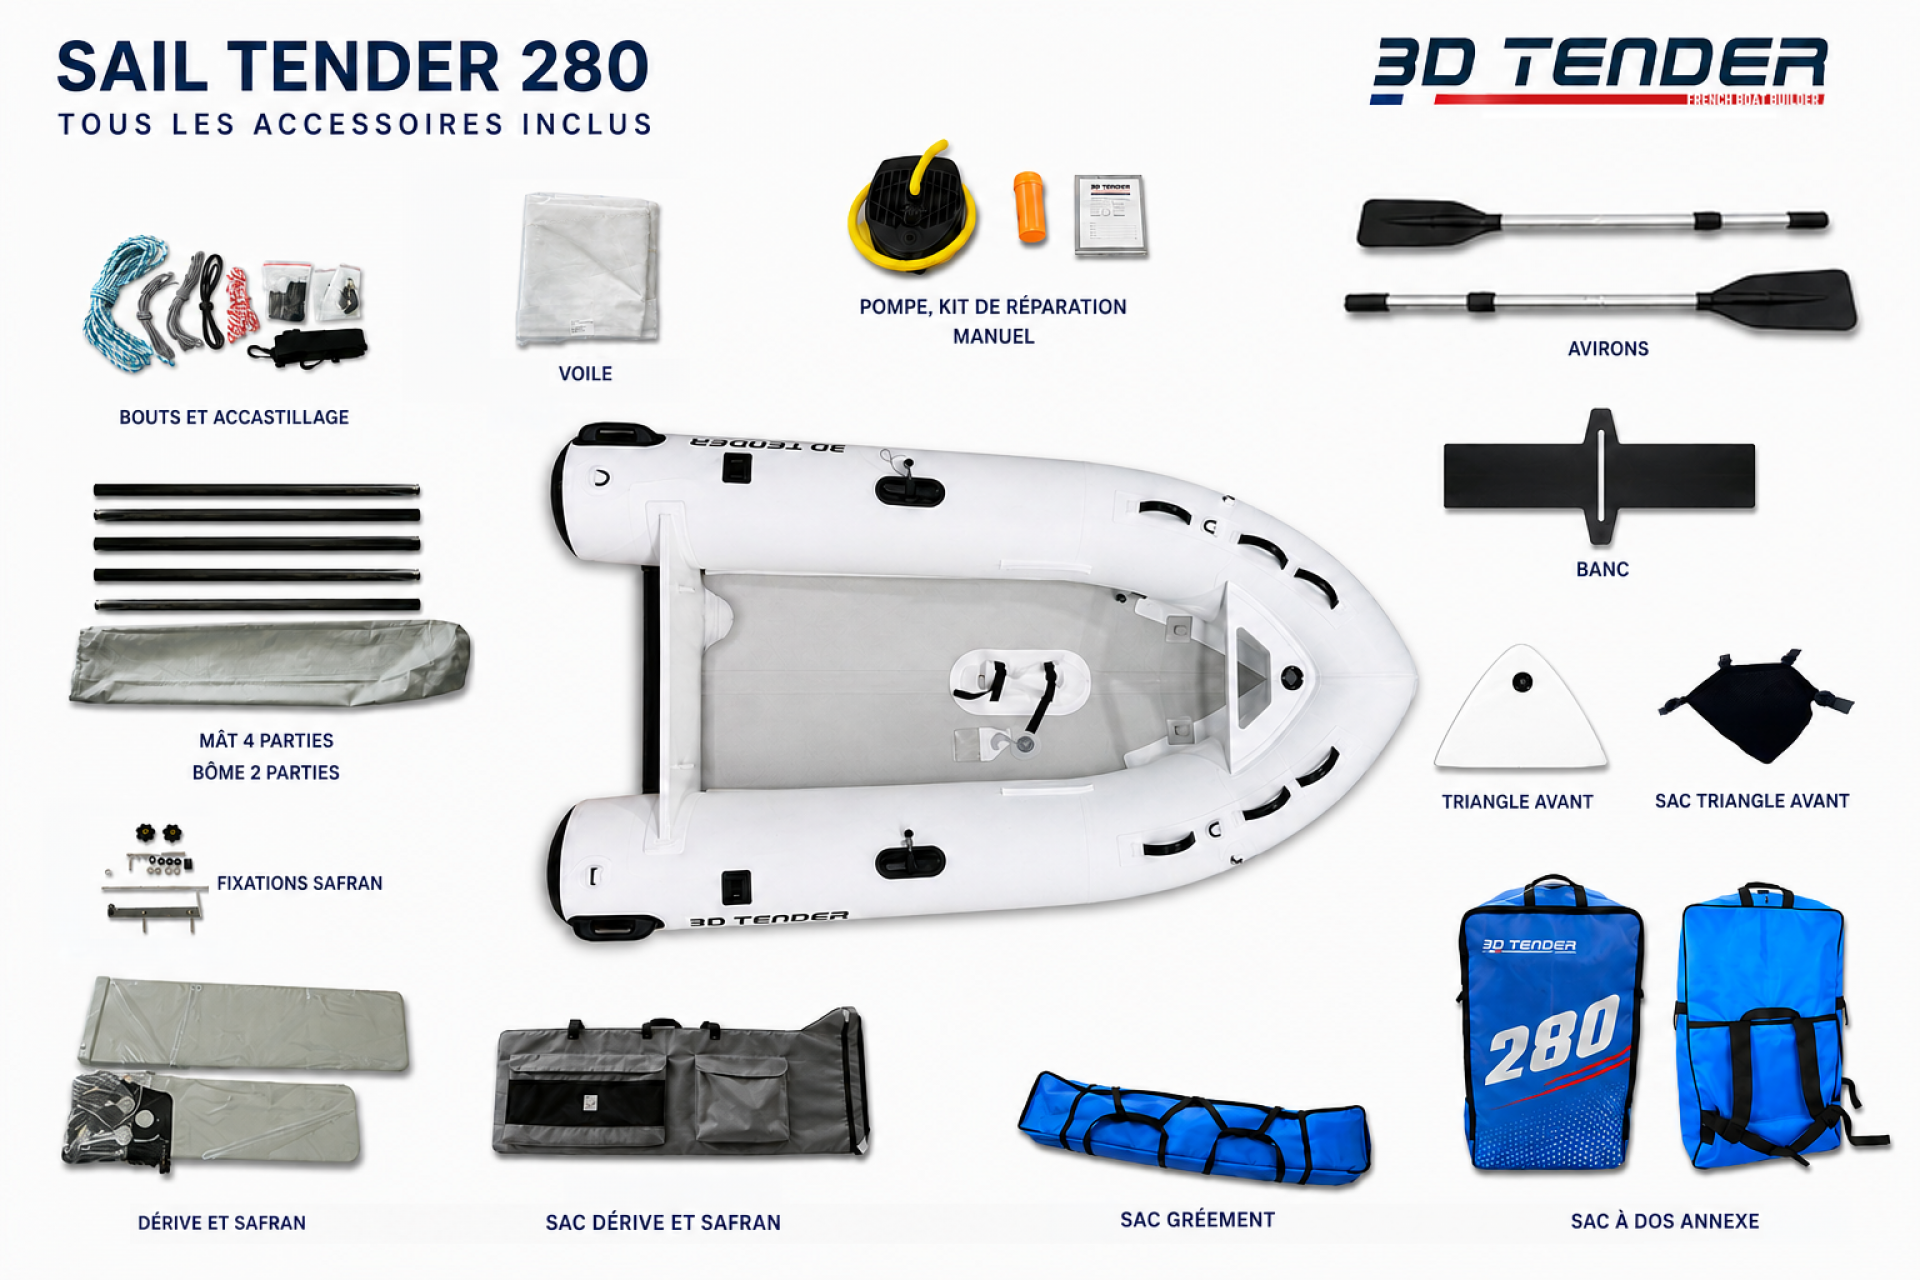
Begin by removing the Sail Tender from its carrying bag and laying out the various components nearby.
You will find the equipment needed to prepare the inflatable boat and convert it into a sailing dinghy, including:
-
The Sail Tender inflatable boat.
-
The inflation pump.
-
The different mast sections.
-
The sail.
-
The boom and its associated components.
-
The daggerboard.
-
The rudder and tiller.
-
The ropes and accessories required for the rigging.
Take a few moments to identify each component before starting. This simple preparation will save you time and make the following steps much easier.
2. Unfolding and Inflating the Sail Tender
Once your equipment is ready, it's time to assemble the inflatable boat!
Step 1: Completely Unfold the Boat
Remove the Sail Tender from its carrying bag and carefully unroll it on the ground.
Gradually unfold the inflatable tubes and the floor until the boat returns to its original shape.
Make sure all parts are properly positioned, without excessive folds or trapped sections.
This step is important: a correctly unfolded boat will be easier to inflate and prepare for sailing.
Step 2: Locate the Inflation Valves
Before starting, identify the inflation valves on the boat.
Check that they are clean and in good condition, then prepare your pump with the appropriate connector.
It is essential to follow the inflation pressures recommended by 3D Tender for each chamber of the boat.
Step 3: Inflate the Boat
Connect the pump to the first valve and begin inflating the boat gradually.
Follow the inflation sequence specified in your model's user manual to ensure the boat takes its correct shape.
Continue until you reach the manufacturer's recommended pressures.
Once inflation is complete:
-
Check that the inflatable tubes are properly inflated.
-
Make sure the floor is correctly positioned.
-
Ensure all valves are securely closed.
-
Check the overall shape and rigidity of the boat.
Important: Never exceed the recommended inflation pressures. Outdoor temperatures and direct sunlight can cause the air pressure inside the tubes to increase.
Your inflatable dinghy is now ready for its sailing rig!

PRO TIP : If you take a break while inflating your Sail Tender and there are still a few wrinkles on the tubes, use this opportunity to install the bench seat and the triangular bow floor section. It will be much easier than installing them once your Sail Tender is fully inflated.

3. Preparing the Sail and Assembling the Mast
Is your Sail Tender fully inflated? It's now time to move on to what makes this inflatable dinghy so special: its sailing equipment.
This stage requires a little organization, but the assembly process quickly becomes intuitive once you are familiar with the different components.
Step 1: Unfold the Sail
Remove the sail from its storage bag and spread it out on a clean surface.
Unfold it completely, taking care to prevent the fabric from rubbing against abrasive surfaces.
Identify the different sections of the sail, its attachment points, and the openings designed to accommodate the rigging components.
Also, make sure the ropes are not tangled.
Step 2: Assemble the Mast Sections
The Sail Tender features a detachable mast designed to make transportation and storage easier.
Take the different mast sections and assemble them in the correct order.
Insert each section into the next until the mast is fully assembled.
Before continuing, check that all sections are securely connected and correctly positioned.
Proper assembly is essential to ensure the rigging remains stable while sailing.

Step 3: Attach the Sail to the Mast
Once the mast is assembled, prepare to install the sail.
Position the sail correctly, then carefully slide the mast into the sail sleeve, following the Sail Tender's assembly system.
Work gradually to prevent the fabric from becoming trapped or twisted.
Take your time to ensure the sail is correctly positioned along the entire length of the mast.
Depending on the rigging configuration, install the necessary retaining components and accessories before raising the mast.
Our tip: Choose a sheltered area for this operation and avoid strong gusts of wind. Even when the boat is on land, an unfolded sail can quickly catch the wind.
Also, be sure to pull the mast all the way to the end of the sail, attach the tensioning line located at the base of the mast, and extend the shrouds. Your sail is now ready to be set up!
4. Installing the Mast on the Sail Tender
The rigging is now prepared. The next step is to install it directly onto the inflatable boat.
Step 1: Locate the Mast Support
On the Sail Tender, identify the system designed to hold the mast foot.
Make sure the area is clear and that no ropes or accessories interfere with the installation.
Step 2: Raise and Position the Mast
Carefully lift the mast with the sail attached.
Hold it firmly and position its lower end above the designated mast support on the boat.
Insert the mast foot into its fitting, making sure it is correctly aligned and positioned.
This operation should be carried out carefully, especially in windy conditions.
If necessary, ask another person to help hold the rigging during installation.
Step 3: Secure the Installation
Once the mast is in position, check that everything is correctly installed.
Make sure that:
-
The mast foot is fully inserted into its support.
-
The mast is correctly positioned.
-
The sail is not twisted.
-
All ropes are accessible and free to move.
-
The retaining and fastening systems are correctly installed.
Your Sail Tender is now starting to look like a real sailing tender !
5. Installing the Boom and Preparing the Sail Controls
After installing the mast, you need to fit the components that allow you to control the sail's position and shape.
The boom plays an essential role: it supports the lower section of the sail and helps you adjust it while sailing.
Step 1 : Attach the Boom to the Rigging
Position the boom at the appropriate attachment point on the mast.
Connect it using the designated fastening system.
Then install the components required to connect the sail to the boom.
Make sure everything is correctly positioned and can move freely.

Step 2 : Install the Sail Control Lines
Next, prepare the ropes used to control the sail, particularly the mainsheet.
The mainsheet allows you to adjust the sail's angle in relation to the wind. It is one of the main controls used to manage the boat's propulsion.
Route the ropes through the designated guides and fittings, following the arrangement shown in the video tutorial.
Then check that everything operates correctly.
The mainsheet must run smoothly to allow easy adjustments while sailing.
Before moving on, ensure that no ropes are trapped, tangled, or incorrectly installed.
Attaching cleats to the shrouds :
Rigging the reef line :

Rigging the sheet : (don't forget the bowline !)

6. Installing the Daggerboard and Rudder
Your sailing rig is now in place. It's time to prepare the equipment that will allow the Sail Tender to maintain its course and change direction.
Two components are particularly important: the daggerboard and the rudder.
Installing the Rudder
The rudder allows you to steer the boat.
Take the rudder assembly and position it at the rear of the dinghy, near the transom.
Install it onto its designated mounting system and make sure it is properly secured.

Then check the tiller attachment and operation.
By gently moving the tiller, you should be able to turn the rudder freely.
Your configuration includes a system allowing the rudder blade to be raised, check that it works correctly before launching the boat.

Installing the Daggerboard
The daggerboard helps reduce sideways drift caused by the wind.
It is therefore essential for efficient sailing, particularly when sailing upwind.
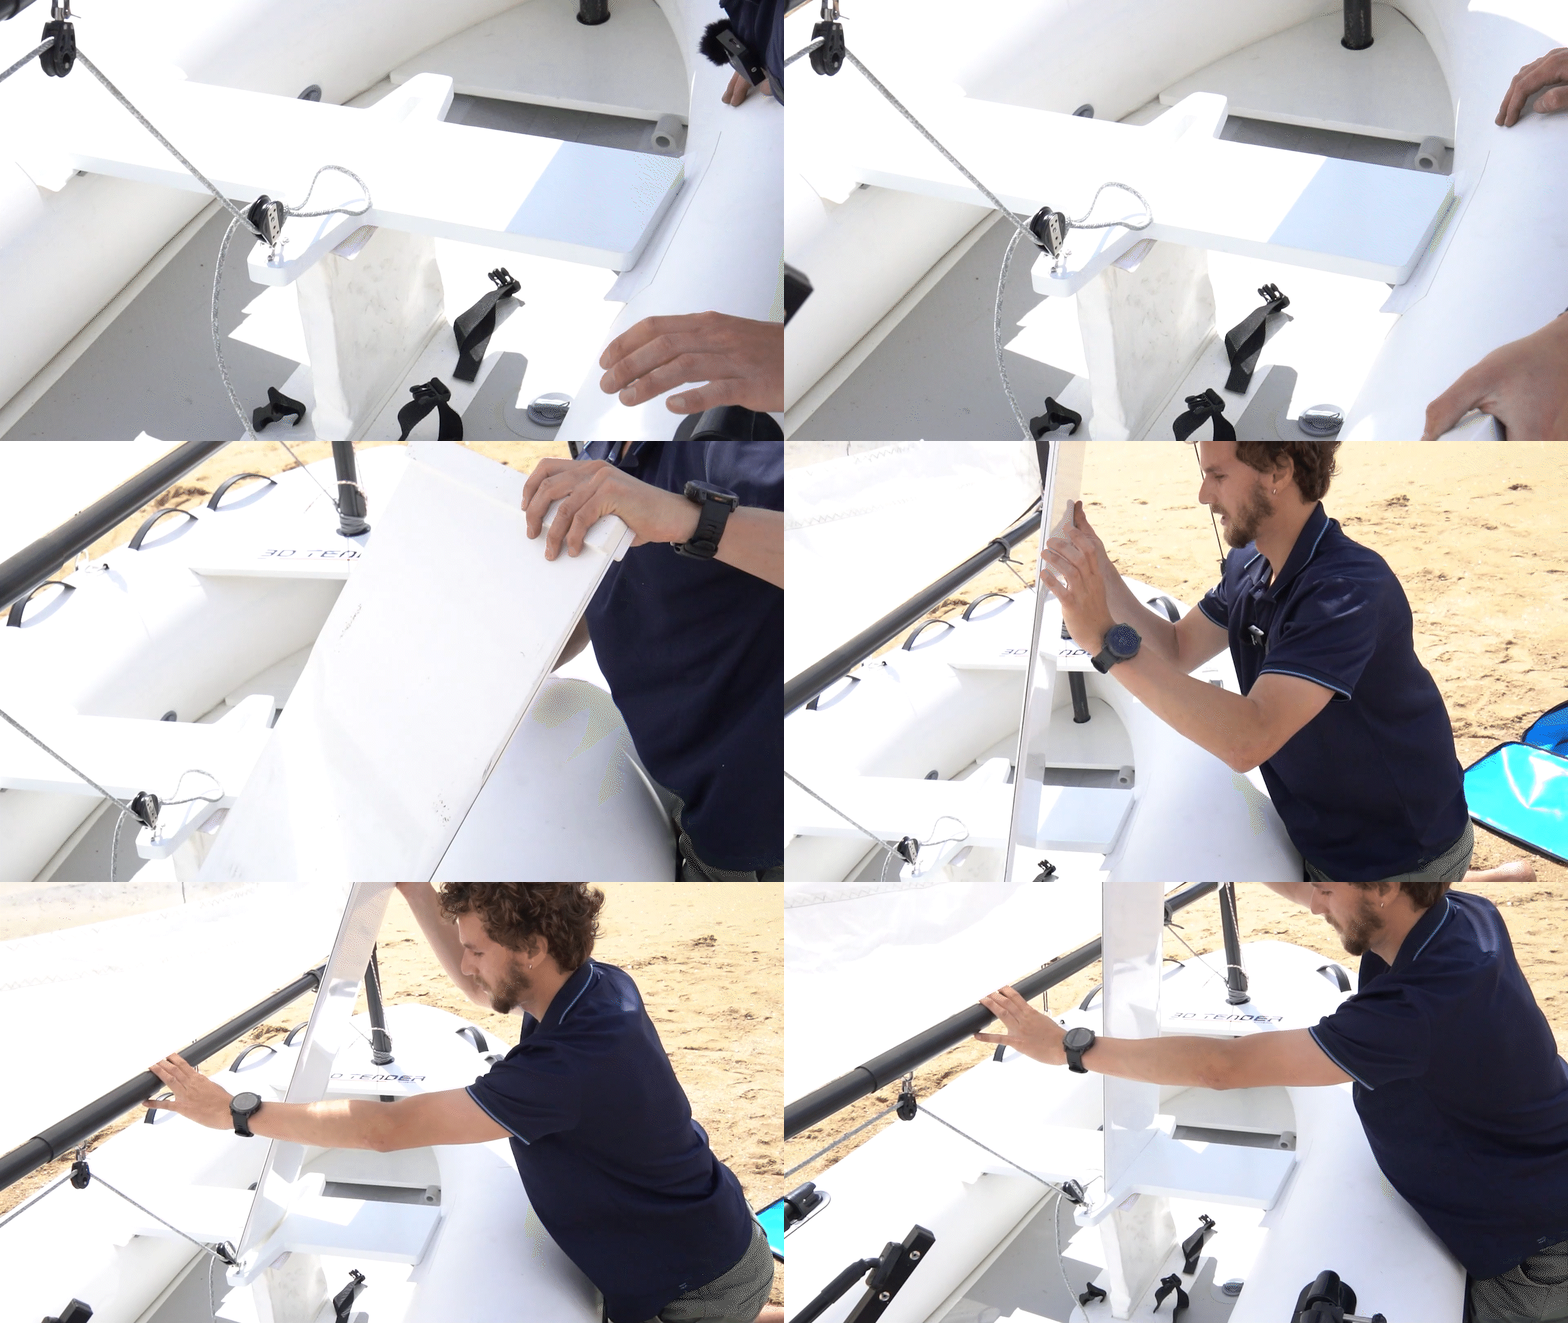
Locate the designated attachment system on the Sail Tender and position the daggerboard according to the assembly instructions.
Make sure it is securely held in place and operates correctly.
Adjust its position according to the sailing conditions and available water depth.
Perform a Final Check
Before launching your Sail Tender, take a few moments to inspect all the equipment:
-
The mast is correctly installed.
-
The sail and boom are securely attached.
-
All ropes run freely.
-
The daggerboard is properly positioned.
-
The rudder is securely attached.
-
The tiller operates smoothly.
-
The inflatable tubes are inflated to the recommended pressures.
-
The navigation cap hasn't been forgotten !

Once these checks are complete, your Sail Tender is ready for its first sailing adventure!
7. Launching Your Sail Tender and Enjoying the Sailing Experience
This is the moment you've been waiting for!
Your Sail Tender is now fully assembled, and you're ready to enjoy your inflatable dinghy as a small sailboat.
Choose the Right Conditions
For your first outing, choose favorable weather conditions, with light to moderate winds and a suitable sailing area.
Avoid learning how to operate your Sail Tender in challenging conditions or strong winds.

Remember: Always wear an appropriate personal flotation device, respect the manufacturer's capacity and operating limits, and make sure you have a suitable way to return safely under the expected conditions.
8. How to Disassemble Your Sail Tender After Use
After a great sailing session, it's time to pack everything away.
Once again, the Sail Tender offers a major advantage: its detachable rigging and inflatable construction allow the entire boat to be packed into a compact, easy-to-transport system.
The disassembly process generally follows the assembly steps in reverse order.
Step 1: Remove the Boat from the Water and Secure the Rigging
Start by returning to a suitable landing area.
Before bringing the boat completely out of the water, raise the submerged components where necessary to prevent them from hitting the bottom.
Then move the Sail Tender onto a clean, clear surface.
Make sure the sail cannot unexpectedly catch the wind during disassembly.
Step 2: Remove the Sailing Equipment
Begin by removing the detachable components.
Remove the rudder from its mounting system, then disassemble the associated parts.
Also remove the daggerboard, following its attachment system.
Place each component on a clean surface to avoid losing or damaging any parts.
If the equipment has been used in saltwater, rinse it with fresh water before storing it for an extended period.

Step 3: Remove the Daggerboard, the Boom and Release the Ropes
Release the tension from the sail control lines.
Then disconnect the different fittings connecting the boom to the rigging.
Carefully remove the boom without pulling excessively on the sail fabric.
Disassemble its sections if necessary and gather the ropes to prevent tangling.
Our tip: Get into the habit of organizing and storing each component as you remove it. This will save you valuable time during your next sailing session.

Step 4: Disassemble the Mast
Hold the mast securely before removing it from its support.
Lower it gradually, making sure the sail is not exposed to sudden gusts of wind.
Once the mast is on the ground, carefully remove the sail.
Then separate the different mast sections.
Avoid forcing any component if it seems stuck. First, check that no locking mechanism or accessory is preventing disassembly.
Place the mast sections next to one another to prepare them for storage.
9. How to Fold the Sail Correctly
Folding the sail properly is an important step in preserving its condition and making storage easier.
A correctly folded sail will take up less space and will be easier to prepare for your next outing.
Step 1: Lay Out the Sail
Spread the sail flat on a clean surface.
Remove any sand, dirt, or debris from the fabric.
If the sail is wet, allow it to dry as soon as possible before storing it for an extended period.
Step 2: Fold the Sail Carefully
Gradually fold the sail according to its shape and the recommended storage instructions.
Avoid creating excessively sharp creases, and do not force the reinforced areas or integrated accessories.
The goal is to obtain a compact package without putting unnecessary pressure on the fabric.

Step 3: Store the Sail and Rigging Components
Once the sail is folded, place it inside its storage bag.
Gather the mast sections, boom, and other accessories, then place them in their designated storage compartments.
Avoid placing rigid or sharp components directly against the sail to reduce the risk of damage during transportation.
10. Deflating and Folding the Inflatable Boat
The final major step is packing away the inflatable dinghy itself.
Step 1: Clean and Prepare the Boat
Before deflating the Sail Tender, make sure there is no sand, water, or debris inside the boat.
If you have been sailing at sea, rinsing the boat with fresh water is recommended to remove salt deposits.
Allow the boat to dry as much as possible.
Storing an inflatable boat in damp conditions for an extended period can encourage unpleasant odors or mold.
Step 2: Deflate the Inflatable Tubes
Open the inflation valves according to their operating instructions to allow the air to escape.
You can also use the deflation function of your pump, if it has one.
Work gradually to let the air escape from the different chambers.
Avoid applying excessive pressure to the valves or reinforced areas of the boat.
Step 3: Fold the Sail Tender
Once the boat is sufficiently deflated, begin folding the inflatable tubes and the main structure.
The objective is to create an even, compact package that fits inside the carrying bag.
Gradually remove any remaining air as you fold.
Take care not to trap the valves, handles, or accessories in excessively tight folds.
If necessary, adjust the folds to distribute the boat's volume evenly.
Step 4: Place the Boat Back Into Its Carrying Bag
Once the Sail Tender is folded, position it on its carrying bag.
Carefully close the bag using the straps and fastening systems provided.
Check that no components are sticking out and that everything is securely packed.
Your Sail Tender is now ready to be transported or stored until your next sailing adventure!

11. Our Tips for Maintaining Your Sail Tender and Extending Its Lifespan
Regular maintenance will help keep your Sail Tender in excellent condition and allow you to enjoy its performance for years to come.
Here are a few good habits to adopt after each use.
Rinse After Sailing in Saltwater
Saltwater can leave deposits on equipment, fittings, and rigging components.
After sailing at sea, rinse the inflatable boat, accessories, and rigging components with fresh water.
Remember to remove sand and any other debris as well.
Dry Your Equipment Thoroughly
Before long-term storage, make sure the sail, carrying bags, and all parts of the inflatable boat are dry.
If you need to pack your equipment while it is still damp, take it out again as soon as possible and allow it to dry completely.
Regularly Inspect the Fittings
Take advantage of the assembly and disassembly process to inspect your equipment.
Pay particular attention to:
-
The overall condition of the inflatable tubes.
-
The inflation valves.
-
The mast and rudder attachments.
-
The ropes and their routing points.
-
The sail fabric and stitching.
-
The daggerboard and rigging components.
If you notice any wear or damage, have the affected component checked before sailing again.
Store Your Sail Tender Properly
To keep your Sail Tender in good condition, store it in a clean, dry area, away from extreme temperatures.
Avoid leaving the carrying bags exposed to direct sunlight for long periods or in contact with objects that could damage their contents.
Want to Learn More About the Sail Tender?
Discover its technical specifications, equipment, and all its advantages directly on our website.
-